
Introduction
Signing Helm charts enables users to verify their integrity and origin. This process can be automated via Helm’s Chart Releaser Action, a GitHub Action workflow that, with the help of the helm/chart-releaser CLI tool, enables a GitHub project to double as a self-hosted Helm chart repository.
This guide shows how you can modify a basic GitHub Actions Worflow file to enable automated chart signing with a PGP key.
If you’re interested in how signed charts are verified, check out the next article: Verifying Signed Helm Charts
Prerequisites
For this guide you’ll need the following:
A Helm Chart Repo hosted on GitHub Pages - [click to expand]
1. Create a new repository on GitHub e.g.
helm-charts, check the Choose a License checkbox and select a license from the dropdown menu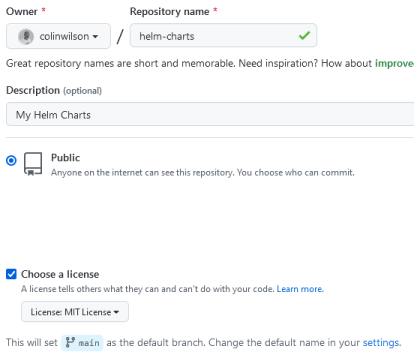
2. Create a new branch named
gh-pages
3. To set the
gh-pagesbranch as GitHub Pages, click on your repo Settings, scroll down to the Pages section and ensure the source branch is set togh-pages /(root)as per below:
4. You can now clone the repository, add your Helm chart(s) to the
mainbranch (as defined by Helm's Chart File Structure) and include a basic Chart Releaser Action workflow file,release.yamle.g:|-- .github/ | `-- workflows/ | `-- release.yaml |-- charts/ | `-- my-helm-chart/ | |-- templates/ | |-- Chart.yaml | |-- LICENSE | `-- values.yaml |-- .gitignore |-- .helmignore |-- LICENSEOnce you commit and push the above files to your GitHub repository the Chart Releaser Action will create a chart index (
index.yaml), package your chart(s) and publish them to thegh-pagesbranch.A PGP Key Pair - [click to expand]
You can generate a PGP Key Pair using the following
gpgcommand:gpg --full-generate-keyFollow the prompts to generate an RSA key pair with a strong passphrase.
You can skip the steps above if you already have a PGP Key Pair and a Helm Chart repository on GitHub using the Chart Releaser Action workflow.
Step 1 - Export & Encode your PGP Secret Key
For the Chart Releaser Action to automatically sign your charts, your PGP secret key (and passphrase) need to be accessed as GitHub repository secrets.
Export your Secret Key
Export your secret keyring using the following gpg command:
gpg --output secring.gpg --export-secret-keysIf you have multiple secret keys and wish to export a specific key from your secret keyring you can list them using gpg --list-secret-keys and target the desired key via its fingerprint with the following command:
gpg --output secring.gpg --export-secret-keys A3263DC3B730792048BB51FD8D918BB4C948960EN.B. By default, GPG version 2 or greater stores keyrings in a format (
.kbx) not currently supported by Helm at the time of writing. The above commands export keys in the legacy format (.gpg) which Helm does support. You can check which version of GPG you’re running using thegpg --versioncommand.
Base64 Encode your Secret Key
The Chart Releaser Action worflow requires your PGP secret key be stored as a base64 encoded GitHub repository secret. Use the base64 command to encode your exported secret key:
base64 -w0 secring.gpg > secring.gpg.base64Step 2 - Create GitHub Repository Secrets
Navigate to your Helm chart repository on GitHub and click on Settings > Secrets > Actions. Then click the New repository secret button to create a new secret. Name the secret GPG_KEYRING_BASE64 and paste the contents of your secring.gpg.base64 encoded file from earlier into the Value textbox input and click Add secret to save it:

Create another secret named GPG_PASSPHRASE. This time enter the passphrase for your PGP secret key in plain text. You should now have two new repository secrets:

Step 3 - Update your Repo & Workflow File to Support Chart Signing
The Chart Releaser Action workflow file needs to be configured to support signing Helm charts. Create or update your release.yaml workflow file with the following contents:
# release.yaml
name: Release Charts

on:
  push:
    branches:
      - main

jobs:
  release:
    runs-on: ubuntu-latest
    steps:
      - name: Checkout
        uses: actions/checkout@v2
        with:
          fetch-depth: 0

      - name: Configure Git
        run: |
          git config user.name "$GITHUB_ACTOR"
          git config user.email "$GITHUB_ACTOR@users.noreply.github.com"

      # Optional step if GPG signing is used
      - name: Prepare GPG key
        run: |
          gpg_dir=.cr-gpg
          mkdir "$gpg_dir"
          keyring="$gpg_dir/secring.gpg"
          base64 -d <<< "$GPG_KEYRING_BASE64" > "$keyring"
          passphrase_file="$gpg_dir/passphrase"
          echo "$GPG_PASSPHRASE" > "$passphrase_file"
          echo "CR_PASSPHRASE_FILE=$passphrase_file" >> "$GITHUB_ENV"
          echo "CR_KEYRING=$keyring" >> "$GITHUB_ENV"
        env:
          GPG_KEYRING_BASE64: "${{ secrets.GPG_KEYRING_BASE64 }}"
          GPG_PASSPHRASE: "${{ secrets.GPG_PASSPHRASE }}"

      - name: Run chart-releaser
        uses: helm/chart-releaser-action@v1.2.1
        with:
          config: cr.yaml
        env:
          CR_TOKEN: "${{ secrets.GITHUB_TOKEN }}"
To sign your charts, the Prepare GPG Key step imports the repository secrets created earlier as environment variables for use by the successive Run chart-releaser step. Chart signing is enabled via the referenced configuration file, cr.yaml. So create a file named cr.yaml in the root of your repository with the following contents:
# cr.yaml
# Set to true for GPG signing
sign: true
# UID of the GPG key to use
key: Colin Wilson
As stated in the code comment the value for key: should be the UID of the GPG key you intend to sign your charts with. The UID can be either the name or email address of the chosen key.
Step 4 - Publish Signed Charts on GitHub Pages
You can now commit and push these changes to GitHub. The Chart Releaser Action will automatically package & sign your charts. Navigate to the Releases section of your repository and you should see that both the charts (*.tgz) and their accompanying provenance files (*.prov) are published under Assets. The screenshot below shows a published Redis Proxy chart and its provenance file in the Releases section of my example repository:

Click on the Actions tab in your repository and you’ll be able to explore in more detail the steps Chart Releaser Action took to sign your chart(s) and publish it/them to GitHub Pages.

Conclusion
There are a number of methods by which Helm charts can be signed (and published) but using Helm’s Chart Releaser Action is definitely one of the least complex and easily accessible ways to achieve this. Now that you’re able to sign charts using PGP keys, the logical next step is to verify them against a public key prior to use. I’ll cover this in my next guide.