
Out of the box Exchange Server does not support DKIM signing. And it doesn’t look like Microsoft has any intention of adding this feature any time soon. So for now the best way to implement DKIM signing is via a third party plugin.
What is DKIM?
DKIM (DomainKeys Identified Mail) is an email security standard designed to make sure messages weren’t altered in transit between the sending and recipient servers. It uses public-key cryptography to sign email with a private key as it leaves a sending server. Recipient servers can then use a public key published to a domain’s DNS to verify the source of the message, and that the body of the message hasn’t changed during transit. Once the hash made with the private key is verified with the public key by the recipient server, the message passes DKIM and is considered authentic.
Source: https://postmarkapp.com/guides/DKIM
If you want to know more about how DKIM works, Postmark provides a pretty detailed explanation.
Installing Exchange DKIM Signer
Exchange DKIM Signer is an open source, easy to install DKIM Signing Agent for Microsoft Exchange Server. It includes support for Exchange Server 2007 through to 2019.
Online Install
1. Download the latest GUI package: https://github.com/Pro/dkim-exchange/releases/latest (Configuration.DkimSigner.zip)
2. Extract it somewhere on your Server (e.g. Desktop)
3. Start Configuration.DkimSigner.exe
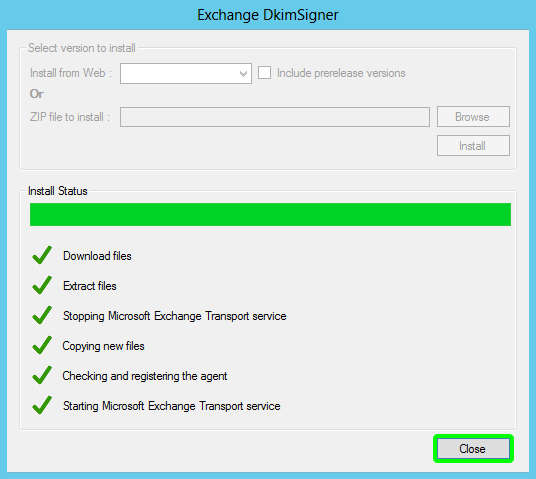
4. Select Install
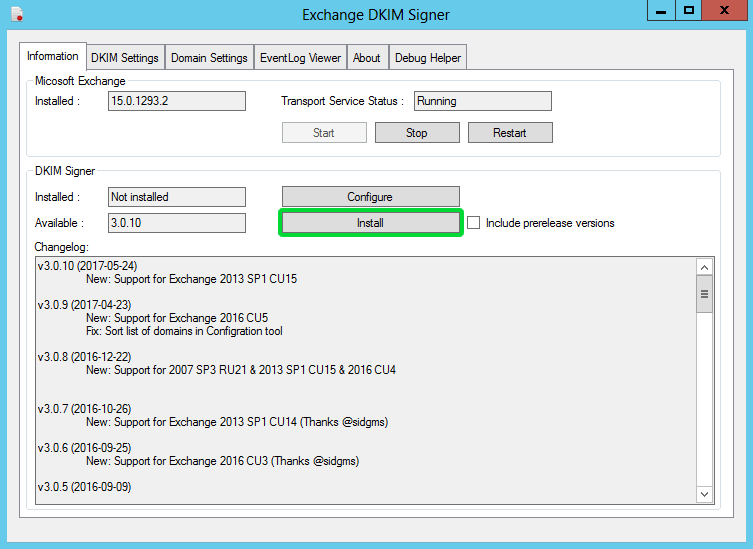
5. Once the installer has completed, click Close
Configuration
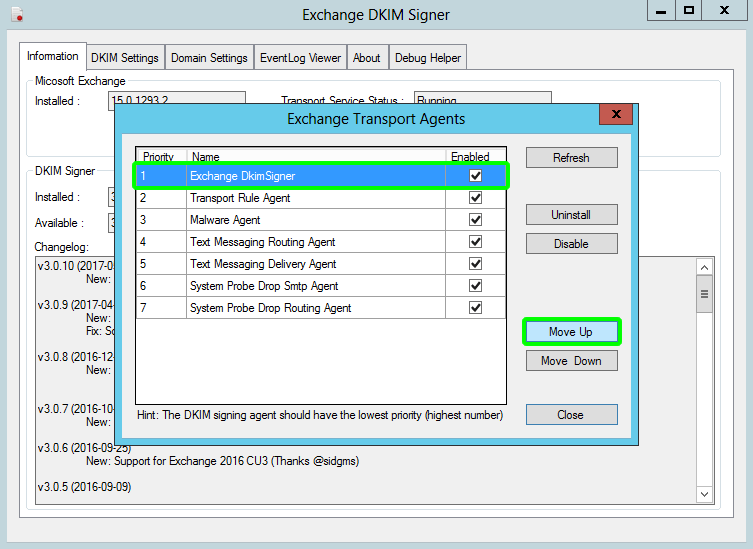
1. Now configure the DKIM Signer with the installed GUI. Navigate to and launch the configuration executable (located under "C:\Program Files\Exchange DkimSigner\Configuration.DkimSigner.exe".
2. Click Configure and move the priority of the DkimSigner Agent up to at least 3, if not 1 (This is to prevent other agents from potentially interfering with the headers), and then click Close
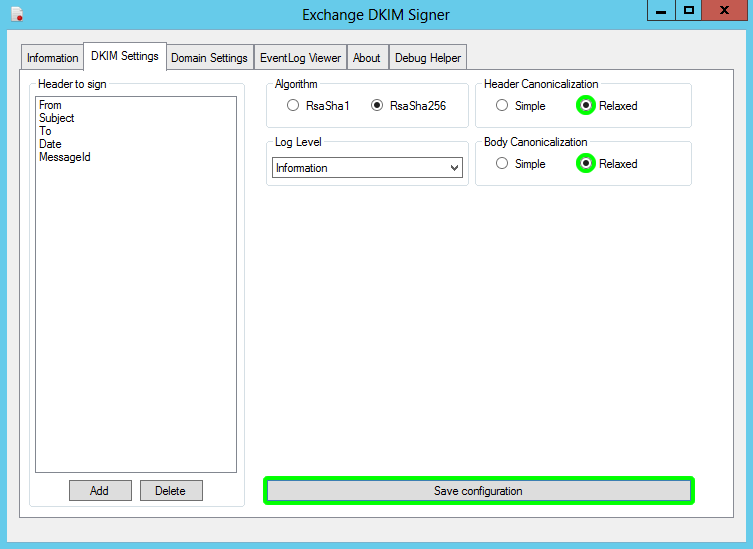
3. Navigate to the DKIM Settings tab and change the Header & Body Canonicalization options to Relaxed. Click Save configuration to save your changes. See DKIM Canonicalization – or – why Microsoft breaks your mail for reasons why choosing Relaxed over Simple may be the better option.
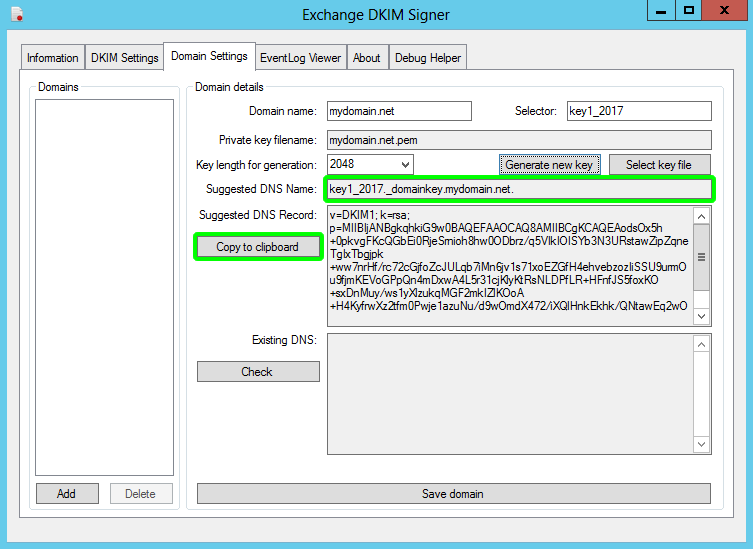
4. Now switch to the Domain Settings Tab. Fill in your Domain name and Selector and click Generate new key. DKIM Signer will then generate new public and private DKIM signing keys based on your chosen domain and selector.
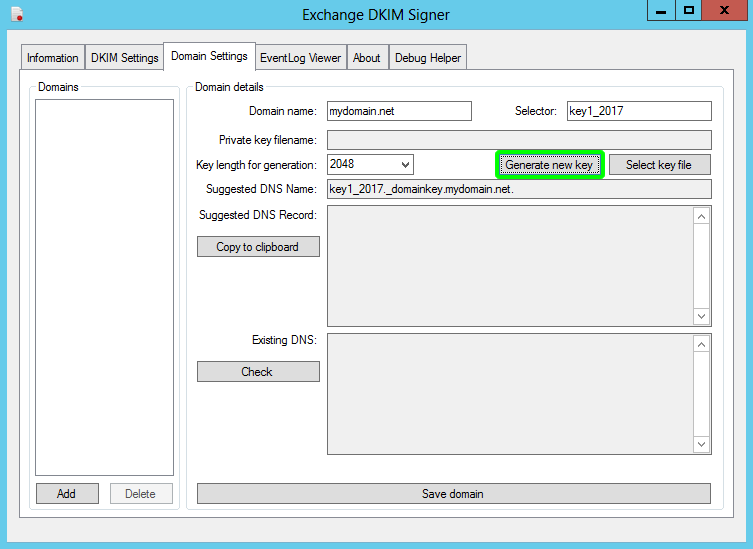
A save window will open prompting you to save the newly generated key in "C:\Program Files\Exchange DkimSigner\keys". Click Save.
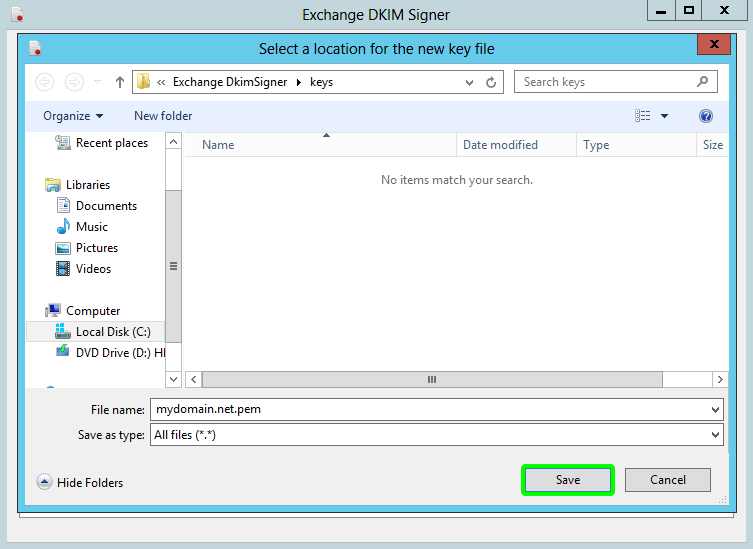
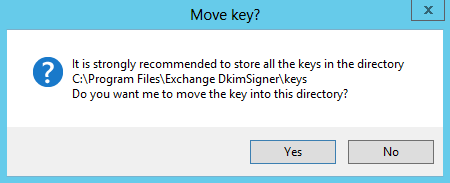
You can save the generated keys to an alternative location if you wish. However DKIM Signer recommends storing them in the default location.
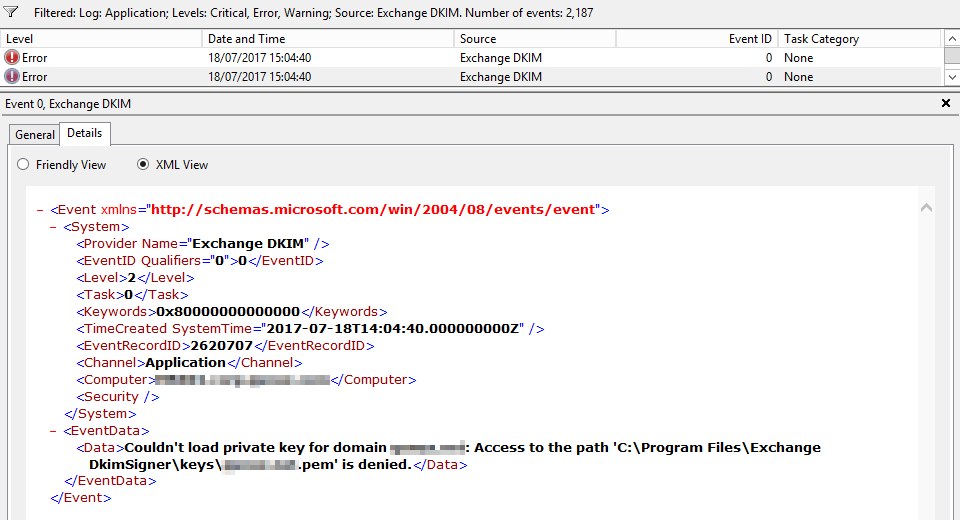
IMPORTANT: Make sure the user you’re signed into your exchange server as has permission to access whichever path you choose to store your keys. Otherwise you’ll encounter access denied errors: "Couldn't load private key for domain mydomain.net: Access to the path 'C:\Program Files\Exchange DkimSigner\keys\mydomain.net.pem' is denied.". And DKIM signing of outgoing mail will fail.
5. Now you need to publish the DKIM TXT record for your domain (mydomain.net) with your DNS provider. Make a note of your Suggested DNS Name and click Copy to clipboard to copy the Suggested DNS Record.
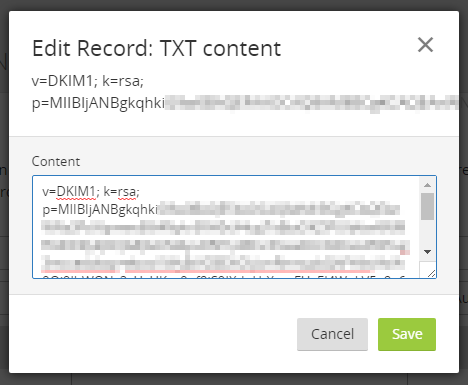
Now head to your DNS provider to create your TXT record.
6. Select TXT record as the type of record to create and for the TXT record Name, enter your Suggested DNS Name (key1_2017._domainkey).

*Most DNS providers automatically add your domain name to the end of the TXT record ‘Name’ entry, so there should be no need to enter the whole record e.g. key1_2017._domainkey.mydomain.net.
For the TXT record content, paste your copied key and save.
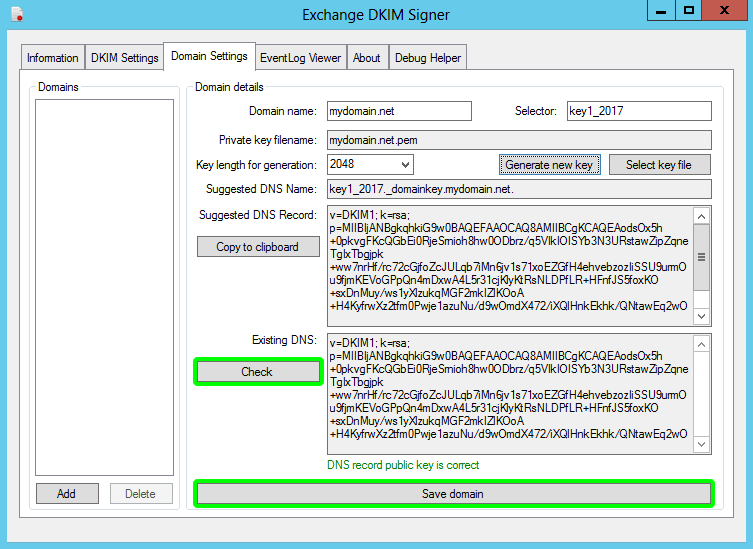
Wait a few minutes for the record to propagate (Most DNS providers are pretty quick these days) then head back to the DKIM Signer Domain Settings tab and click Check. DKIM Signer will query your DNS record and if all’s well your record should now be verified as correct. Click Save to save your domain settings.
7. Switch to the Information tab and restart the Exchange Transport Service by clicking on Restart.
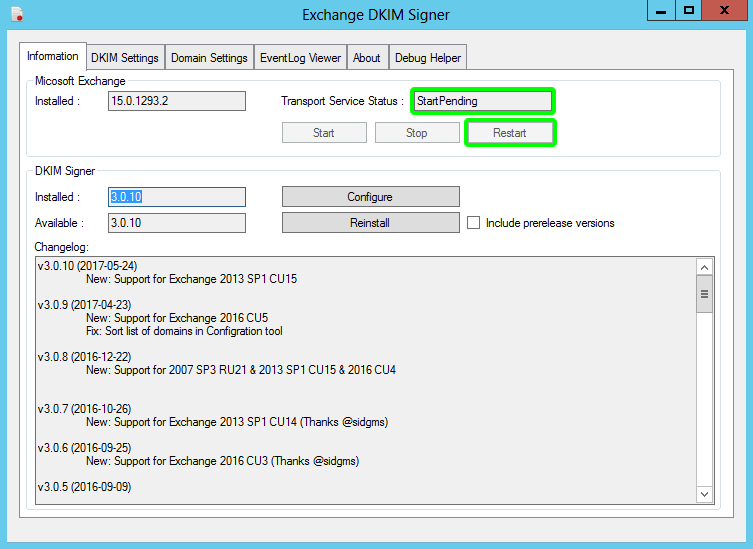
DKIM Signer is now configured to sign emails originating from your domain.
Testing
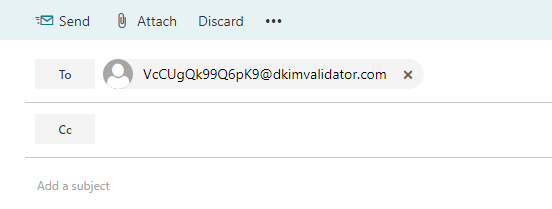
1. Open your web browser of choice and navigate to http://dkimvalidator.com/. Make a note of the randomly generated email address. DO NOT CLOSE THE BROWSER/TAB, you’ll need to return to this page shortly.

2. Log into an Exchange mailbox associated with the domain you’ve just setup and send an email to this random address.
3. Allow a few minutes for your email to arrive at dkimvalidators.com’s site then return to your browser and click on View Results.
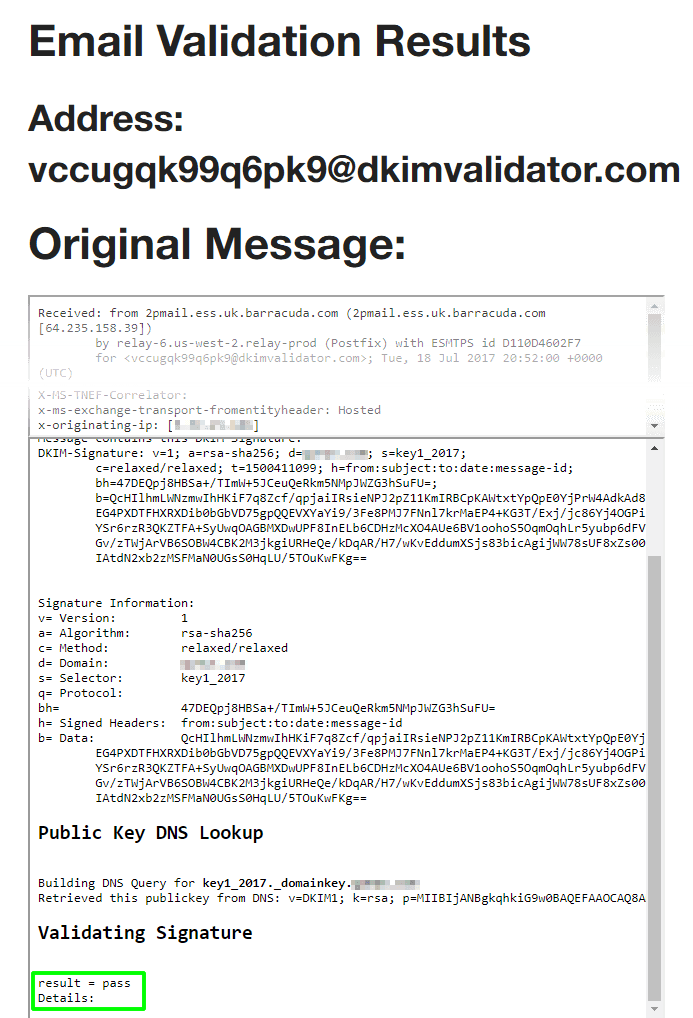
If you see results = pass, congratulations, your setup is complete and you can now send email verified using DKIM signing.